Most people think that PowerPoint is just for presentations that put you to sleep. In fact, it’s a very versatile tool and fairly easy to get a lot out of, despite seeming a little scary at first glance. Here I’ll show you how to create two simple PowerPoint games.
Hidden Pictures
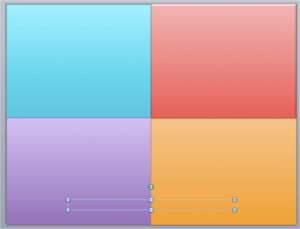
I made this example a while ago, and if I did it again I’d probably use #eltpics! Although it doesn’t look like much here, if you download it you can see that each time you click a box disappears, gradually revealing a picture and a word underneath. As this happens, students call out or write down what they think the picture/word are.
[To download, click ‘view on slideshare’. You may have to log in (not sure), but it’s completely free. You should then be able to click on ‘download’ above the document.]
This is great for revising vocabulary especially with young learners, who get very into it – definitely a stirrer rather than a settler! It could also be used for introducing or revising modals of speculation – as you reveal a picture, students have to guess what’s in the picture, or what the people are doing.
This is how to make it. I’m using PowerPoint for Mac, so my screen may look a little different from yours, but the names of the menus are normally fairly similar – click on a few things and see what happens! If it really doesn’t work, let me know and I’ll add screenshots from a Windows computer.
Creating the basic template
- Open PowerPoint. You will normally see a title slide already in your presentation. Delete it.
- Add a blank slide. Insert new slide > Blank
- Decide how many boxes you want covering your picture – I would recommend four or six, unless the picture is quite complicated, in which case nine could work. Generally students guess quite quickly, so lower numbers are better to avoid boredom.
- Insert a rectangle. Shapes > rectangles then click and drag the box where you want it to appear.

- Copy the box using CTRL + C (CMD + C on a Mac).
- Paste it three, five or eight more times, using CTRL + V (CMD + V on a Mac)

- Click and drag the boxes so that they fill the slide.

- As you can see, my boxes don’t quite fill the slide. This normally happens, so resize the boxes to fit or to leave space for some visible text at the bottom of the slide.
- If you want to, you can change the boxes so that they are different colours. This makes it easier for you and your students to see at a glance how many boxes there are and what part of the picture they cover. To do this, double-click on the box you want to change. A box should appear. Edit the ‘fill’ and the ‘line’ to the colours you want.

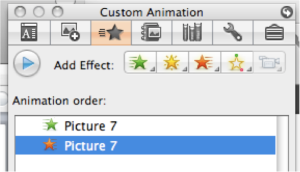
- Next you need to animate the boxes so that they will disappear. Click on the box you want to disappear first. Then click Slide Show >Custom Animation, select ‘exit animation’ and choose the style of animation you want to use. I would recommend something simple, as you don’t want it to distract from the purpose of your activity. I would also suggest using the same style of animation for all four boxes. There is normally a preview so you can see what happens with each effect.

- Repeat this process for all of the boxes on your slide.

- Once one slide is ready, copy and paste it a few times so that you have as many slides as you need.

- To make the slides a little less predictable, go to some of the slides and change the order of the animation so that the boxes disappear in a different order. On my version of PowerPoint, you do this by selecting the name of the shape (‘rectangle 5’ in the example below) and using the arrow keys to move it up or down the order.

- If you want to reuse this type of game for different purposes, save what you have now as a template so you can reuse it without having to start again from scratch.
Adding your content
- Choose the images you want to use in your game. I would recommend using #eltpics as you don’t have to worry about infringing copyright, as long as you credit the photographer. To find out how to download #eltpics, watch this screencast. I’m going to use the jobs set in this example. Collect the images that you want to use in one place – I normally put them on my desktop, then delete them when I’ve finished. Don’t forget to record the source!
- Returning to your PowerPoint, insert the first image on the first slide. Insert > Picture > From file > [your file name] It should appear on top of the boxes. Resize/move it if necessary.

- Right-click on the image, then arrange > send to back. It should now have magically disappeared behind the boxes.
If you want to see it again, right-click on any of the coloured boxes, choose ‘send to back’ and you should see a corner of the photo. You can then right-click on the photo and choose ‘bring to front’ to see it again.
- Add any words you need, as well as the source of the photo in text boxes. Insert >Text box, then click and drag where you want it to appear.

- Right-click on the text boxes and choose arrange > send to back again.

- Repeat this process for all of your other slides, so that you now have photos and text on all of them.
- Preview your slideshow to check how it works. Slide show > View slide show You might want to change the order of the box animation on some slides if it is too easy to guess what the hidden image shows. For example, if removing the orange box first shows the farmer’s body, it will probably be a lot easier to guess than removing the blue box first.
- Save.
- Play!
Here is the finished version of my example. Click to download it: Jobs hidden pictures game eltpics
Flash vocabulary
In this game, pictures or words flash up on the screen for a few seconds each. Afterwards students write as many of them as they can remember. It is great for revising old vocabulary, especially if it is a few lessons old.
Manual version
- Choose the images you want to use in your game. I would recommend using #eltpics as you don’t have to worry about infringing copyright, as long as you credit the photographer. To find out how to download #eltpics, watch this screencast. I’m going to use the same photos as above from the jobs set in this example. Collect the images that you want to use in one place – I normally put them on my desktop, then delete them when I’ve finished. Don’t forget to record the source!
Alternatively, for every stage saying ‘images’ below, you can do the same with text boxes so that words flash on the screen. - Open PowerPoint. You will normally see a title slide already in your presentation. Delete it.
- Add a blank slide. Insert new slide > Blank
- Insert the images on the slide. Insert > Picture > From file > [your file name] Resize/move them so that they are all arranged on one slide. Alternatively, you could place each image on a different slide.

- Next you need to animate the pictures so that they will appear and disappear. Click on the picture you want to appear first. Then click Slide Show >Custom Animation, select ‘entrance effect’ and choose the style of animation you want to use. I would recommend something simple, as you don’t want it to distract from the purpose of your activity. I would also suggest using the same style of animation for all of the pictures. There is normally a preview so you can see what happens with each effect.
- With the same picture still selected, choose an ‘exit effect’.

- Repeat for all of the pictures.

- Preview your slideshow to check how it works. Slide show > View slide show
- Save.
- Play!
You can now play the game by manually clicking through the images so that they stay on the screen for as long as you like. However, if you want the game to be a bit more automatic, you can now add timings.
Adding timings
- Click Slide Show > rehearse timings.
- Your game should appear as a full-screen slide show. Click through the pictures so that they stay on the screen for as long as you want them to. For this game, 2 or 3 seconds is probably enough.
- Once you have shown every picture and clicked out of the slide show, you should be given the option to save the timing to use in the future.

Here is the final version of my example, including timings. Jobs flash vocabulary game eltpics
I hope these two games are useful to you. Please let me know if any of the instructions are unclear.
Enjoy!


Nice ideas, Sandy. I think that PowerPoint really comes alive when you use it for motivational game-type activities. Here’s a post I wrote a while ago about spicing up ‘end-of-unit-quizzes’ with PowerPoint:
http://www.yearinthelifeofanenglishteacher.com/2011/06/turning-end-of-unit-quizzes-into-competitions-a-couple-of-powerpoint-games-i-sometimes-use-in-class/
LikeLike
I want to publish a game that i have created on power point, how can i add that game in my blogspot. Would you tell me please?
LikeLike
I use slideshare, a site where you upload your powerpoint and then embed it into a wordpress post.
LikeLike