
On Thursday 20th January 2022, I presented a webinar for Teaching House. This was the abstract:
Authoring tools allow you to create learning content without any specific technical expertise. In this webinar we will look at a range of different authoring tools, including Quizlet, Flippity and Learning Apps. With these tools, you can add variety to your lessons without too much extra work, whether you’re working online, face-to-face or hybrid. Even if you’re already familiar with these tools, you’ll hopefully still go away with a range of activities you can use to exploit them.
Rather than using slides, I took attendees on a live tour of each of the three selected sites, showing them examples of resources they could use and talking about activities they could do with them.
Here’s a recording of the session:
Flippity

Flippity allows you to create a wide range of different activities. They’re all based around Google spreadsheets. Don’t let that put you off though! They’re actually really easy to use, and some of them even have ‘Quick & Easy’ versions so you can skip the spreadsheet. I like the fact that there are demos of every tool, and the step by step instructions are really clear. The results are generally quite visually striking too.
Note: You need a Google account to be able to use most of the tools – that’s the easiest way to make sure you will always have access to your creations. Any tool with a ‘Quick and Easy’ option can be used without Google – you have to bookmark it if you want to be able to use it again.
Flippity – Timeline example
Every activity has a demo and instructions, linked from the grey buttons on the homepage.

Click on Demo to understand exactly how the tool works and what the end result will look like. I find it really helps to do this first to check that the tool works as you expect. Here’s the ‘Timeline’ demo:


Once you’ve selected the tool you want to use, click on Instructions. They’re always step by step, and troubleshoot common problems at the bottom of the page.

As you can see, the instructions start with a link to a template. When you click the link, you’ll be asked whether you want to make a copy of the template.

If you click ‘Make a copy’, it’ll appear in your Google Drive, and the spreadsheet will automatically open.


When I’m working with the templates, I normally delete almost all of the data, but leave a few lines at the top as an example to remind me what I can put where.

Then I rename it and add my own information to create my version of the document.

I remove the rows with the example data.

Once you have the data you want to use, go back to the instructions to find out how to make it public.


Once you’ve confirmed you want to go ahead, the ‘Publish to the web’ dialogue box should look something like this:

Then go to the tab at the bottom which says ‘Get the Link Here’ to find the link you need to see the final document (my timeline in this case):

Click on the link to see the resulting document:


Flippity – Randomizer examples
The randomizer has two different ways of editing it. You can access both of them from the Instructions page.
One is ‘Quick and easy’, giving you only one set of information. The Flippity example is countries:

The resultant Randomizer looks like this:

The second option is to edit a spreadsheet, in a similar way to the timeline above. This gives you the option of having up to 10 columns. The template looks like this:

And this is the 4-column Randomizer:

Flippity – Random name picker example
The Random Name Picker only has a Quick & Easy option, but honestly, that’s all you need! 🙂

And from that simple list, you can generate an incredibly useful set of options. For example:


…and so on!
Activities with Flippity
There are currently 26 different tools available on Flippity, with the potential for creating a huge variety of different things you could with them. Here are some ways I’ve used them, or ideas I’d like to try one day.
- I created a Random Name Picker for each of my classes, which I bookmarked to my browser and opened at the start of every lesson. Because they could see it was truly random, I got fewer arguments when deciding on grouping, ordering, or nominating students!
- Timelines are wonderful for projects. It doesn’t take long for students to work out how to use the timelines themselves, once you’ve given them a brief tutorial. The results are beautifully presented and students are generally happy to spend a long time working on them. You can prepare before the lesson by creating the copies of the templates and publishing to the web already so that students don’t need to deal with these steps. Then share the edit link with students during the lesson.
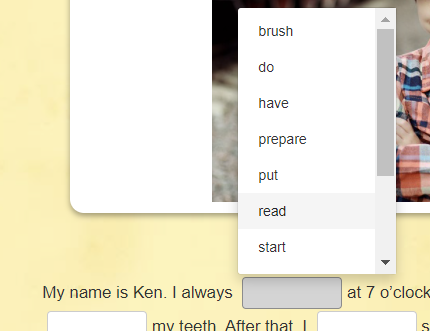
- The Randomizer works well for storytelling prompts, which could come from you, from the students, or both. I’ve also used it as a prompt for drilling with beginners, generating different combinations of daily routine phrases and times for students to practise producing correct sentences.
- The Badge Tracker could be used for homework or learner autonomy challenges, allowing students or parents to see progress with a series of activities.
- Spelling words would be useful for both self-study and work in class. You can have up to 50 individual spelling lists, and you can automatically get quiz results emailed to you.
Feel free to share your ideas for using Flippity in the comments. I highly recommend you just head over there and play around!
Learning Apps
I find LearningApps to be somewhat less intuitive than Flippity, but the range of tools and ready-made activities which you can try out definitely count in its favour. You can access it in a range of languages, which are currently German, English, Spanish, French, Italian and Spanish. You can also embed the apps into other pages.
While you can use it on a phone and a computer, the phone display is generally pretty small, and quite fiddly for creating apps. Although it’s possible to play the games on a phone too, the interface isn’t ideal and the text is quite small. For students with computer access, there are a lot of options though, which is why I’ve included it.
This is generally the page you will first land on:

You can find out more about LearningApps and view a (helpful!) tutorial in a slightly hidden way, by clicking on the website logo in the top left to get to this page:

Note: You need to sign up to be able to save apps you create and to bookmark other people’s apps within the site. You can use other people’s apps without signing up.
Learning Apps – how to create content
Click on ‘Create App’ at the top of the page. It will take you here:

Click on a type of app to see three real examples of that app in use.

If that’s what you want to use, then click ‘Create new App’ – the blue button in the top right of the examples window.
It will take you to a template:

Template options vary depending on what kind of app you want to create. Follow the instructions to fill in the template:

And define any further options at the bottom:

Then click to Finish editing and see the results:

You can choose to continue editing or save the app from the preview screen:

Once it’s saved, you can see a link, an embed option, a QR code, and the option to edit it again if you want to.

As you can see, the text is somewhat cut off in my Matrix. There is a ‘full screen’ option – a tiny box with 4 red arrows in the top right, visible next to the top speech bubble in the image above. That makes more of the text visible, but you can’t see everything, so I would need to go back and edit to make sure the text fits properly. That’s one slight limitation, as the character limits aren’t made clear in the template, but it’s very easy to work around it.

Learning apps – activities
Here are some ideas for using Learning Apps. I think it’s best if students create the apps themselves and then set them for classmates to do. It’s an interesting way to motivate them to produce writing or speaking (most apps have audio options), though you may need to do some mini tutorials to help them.
The Number line can be used for putting processes in order. This example shows the steps of a recipe:

It could also be used for ordering concepts, like size or temperature adjectives, or events, like the events in a story.
Matching pairs on images can be used to allow students attach words to parts of images. In this example, they are prepositions of place:

When students click on a red flag, they are asked to choose the appropriate sentence:

Apart from vocabulary and prepositions, it could also be used to identify parts of a text, discourse features, or examples of particular phonemes.
Cloze text allows you to create gapped texts, and asks students to choose the correct options. This is either by choosing from all of the options, or from subsets of them as defined by you. Here is an English example with all the options:
Here is a German example of subsets:

You could use this to create interactive versions of exam practice activities which students could try at home, to revise vocabulary, to focus on style differences, or to focus on grammar differences like active v. passive.
As with Flippity, there are lots of different options, and the best way to work out what’s possible is to head over to LearningApps and have a play yourself. As I mentioned at the top, it’s not brilliant on phones (though not impossible) but on tablets or computers I think it would work well. Before you start making your own though, I recommend checking whether anybody has done your work for you by browsing existing apps! Also remember that students can make content quite easily with the website too, and this could be motivating for them.
Quizlet
The final authoring tool I presented was Quizlet. As I’ve previously written a pretty comprehensive post about how to create content and use the activities, you can head over there to find out more. The main difference since I wrote the post is the addition of a new function called ‘Checkpoint’, which is a variation of Quizlet Live. Here’s the Quizlet introduction to the new function.
Over to you
I know there are many other authoring tools out there, but I wanted to pick ones I’ve used myself and which I know are generally free and very versatile. What are your favourite tools? What other activities have you tried using Flippity, LearningApps or Quizlet?
